
Dec 1, 2008
My Tribute to ACP Ashok Kamte, ATS Chief Hemant Karkare, encounter specialist Vijay Salaskar n all people who lost his life in Mumbai fight against terrorist in the November 2008 Mumbai Terrorist Attack on Wednesday 26 Nov 08.

The ACP Ashok Kamte was a bundle of opposites His fit, muscular build and trademark beret — rather than a senior police officer’s khaki cap — gave him the look of an army commando. And sure enough, he too had taken part in many encounters, earning a reputation for daring. ACP Ashok Kamte had earlier served as the commissioner of Sangli. Kamte was always known to be in the thick of action.
I deeply grieved to hear about the sad demise of our Ashok Kamte Sir. I pray to god to give strength to his family rest his soul is peace.
I salute ACP Ashok Kamte and pray to GOD to give him Peace.

MY INDIA…
Where the mind is without fear
and the head is held high;
Where knowledge is free;
Where the world has not been
broken up into fragments by
narrow domestic walls;
Where words come out from
the depth of truth;
Where tireless striving stretches
its arms towards perfection;
Where the clear stream of reason
has not lost its way into the dreary
desert sand of dead habit;
Where the mind is lead forward by thee
into ever-widening thought and action-
Into that heaven of freedom, my Father,
let my country awake.
-Rabinderanath Tagore
I LOVE MY INDIA.........
Oct 28, 2008
Maddy wishes all readers, subscribers, Ec droppers and visitors of Great registry hacks and their friends and families


Oct 27, 2008
Today i received wonderful butterfly award from Allure
Thanks Allure for this award. I must accept this award because if i don't you will get angry at me.
I am now giving this award to my top 25 EC droppers...
- http://news.septagonstudios.com
- http://nice2all.com
- http://joytoy-challenges.blogspot.com
- http://www.studkickass.com
- http://www.bonotravel.blogspot.com
- http://www.marriageandbeyond.com
- http://60wereenough.blogspot.com
- http://www.ebooktechie.com
- http://techbypc.com/blog
- http://mypicturesofmontana.com
- http://www.ezdiyelectricity.com
- http://time2cre8.blogspot.com
- http://theadmaster.net
- http://paperkraft.blogspot.com
- http://mrmomsunite.blogspot.com
- http://www.alluricious.com [award received from her]
- http://www.iwalku2.com
- http://www.theladyprogrammer.com
- http://www.ebcak.com
- http://www.scrapsofmind.com
- http://www.thesingleparenttalks.com
- http://www.basketballdaily.today.com
- http://www.melissashomeschool.blogspot.com
- http://the-goodlife.blogspot.com
- http://www.greenstew.com
The Rules:
1. Put the logo on your blog.
2. Add a link to the person who awarded it to you.
3. Link 10 other bloggers of whom you want to give this award to.
While there are so many blogs that I enjoy, and deserve mention, I am going to pass this award to just a few, for now.
When AutoPlay is activated n our Data CD/DVD or flash drives inserted, Windows will execute an Applications which is configured in autorun.inf. Read Wiki for more information of Autorun.inf
Mostly all viruses travels from autorun to system directory or drive
Here ill tell you how to block specific files from autoplay instead of Disabling Autoplay system.
Settings:
1] Run > regedit
2] go to HKEY_LOCAL_MACHINE\SOFTWARE\Microsoft\Windows\CurrentVersion\Explorer\AutoplayHandlers\CancelAutoplay\Files
3] Add New String value and name it with application name which you want to block.
4] e.g.- Some bad coders use shell32.exe (system contains shell32.dll, see the difference between .exe n .dll) to execute virus from autorun.inf
[note:- shell32.exe, run32.exe, ntdetect1.exe these used to run virus cause system contains this named dll]
5] so to block shell32.exe from autorun i'll add new string value - name 'shell32.exe'
6] to block any other applications which contains 32.exe, so ill add '*32.exe'
7] you can block any file formats, e.g- vb scripts like 'killtask.vbs'
8] or you can set '*fun*' something like for blocking fun.exe
9] read by default string names to better understand..
Done. :)
Oct 16, 2008
Two days ago i wrote another program for adding my favorite folder at drives context menu in My Computer.
This application allows you to add your favorite or working folder to drives context menu..
You can Set/Update/Remove this context menu easily using this application..
Useful for lazy people like me :)

Download:
AddContextDrive.zip (mirror1)
Oct 8, 2008
Most of all viruses first blocks your Registry and Task Manager, So you can not remove viruses manually from start up and also you can not kill running virus process, so you need to Enable Task manager and Registry to kill process and remove from start up..
Last night i just wrote this little application for my handy use when playing with virus, hope its useful for everyone :)
This application is allows you to Enable/Disable your registry Editor, and also allows you to Enable/Disable your Task Manager (User/admin)..
Download:
Download (mirror1)
Sep 30, 2008
Last night i wrote an application to remove files context menu and Property tab of Quick Heal scan..
Last month I'd post about registry settings of quick heal context menu and property tab, n by using this hacks i wrote this application to easily enable and disable the context menus n property tabs
Features:
1] Disable / Enable Quick Heal context menu of files
2] Disable / Enable Quick Heal context menu of folders and drives
3] Disable / Enable Quick Heal property tab of files
Download this by using below links:
1] Download - Mirror 1
For uninstall Quick Heal read this post
Sep 27, 2008
Finally, after successful month now time to reward Entrecard top droppers. First of all THANKS to top droppers n all EC droppers too...
I want to reward my all top droppers but i haven't enough credit on EC n haven't free space on my blog to show my top droppers.. but still i want to show my all top droppers badges on my blog, then what can i do??
So i thought i can write an ad rotator in PHP script for my blog ( specially for blogspot, cause i haven't my own domain or space) n today i finished n want to use this script to show my top droppers (but still im working on my ad rotator script to make it useful for every blogspot user)
Here below im showing random badge of my top droppers (only out of top 25 droppers) and on top right side of my blog im showing top 10 droppers (refresh n check)
THANKS
And my 50 top droppers are:
- http://sesantos.com.ph (31)
- http://thefitnessdiva.blogspot.com (31)
- http://www.studkickass.com (31)
- http://julianasworld.com (30)
- http://www.mamaflosatx.com (30)
- http://60wereenough.blogspot.com (30)
- http://luceljuliana.com (30)
- http://mytrampingview.blogspot.com (30)
- http://www.julianaslair.com (30)
- http://mariucasperfume.blogspot.com (30)
- http://ocgolfcourse.com (29)
- http://www.SearchEnginePanel.com (29)
- http://www.insideworldsoccer.com (29)
- http://www.livelife365.blogspot.com (29)
- http://www.videos.stevenhumour.com (29)
- http://www.iwalku2.com (29)
- http://activerain.com/blogs/richd (29)
- http://www.ebcak.com (29)
- http://www.pipeb.com/blog (28)
- http://leafindeforest.com (28)
- http://www.communicationexchange.blogspot.com (28)
- http://vigltd.blogspot.com (28)
- http://sandiegobackroads.today.com (28)
- http://writingsofmaria.com (28)
- http://myideas1.podbean.com (28)
- http://www.bizphere.com (27)
- http://www.fwaggle.org (27)
- http://hueandhysteria.com (27)
- http://nice2all.com (27)
- http://www.michaelaulia.com/blogs (27)
- http://joytoy-challenges.blogspot.com (27)
- http://bald-guy-about-sports.blogspot.com (26)
- http://mariuca.blogspot.com (26)
- http://www.laaneworld.com (26)
- http://joanjoyce.com (26)
- http://michwood.blogspot.com (26)
- http://wongsk.blogspot.com (26)
- http://30somethingandsearching.today.com (25)
- http://www.theladyprogrammer.com (25)
- http://www.greenstew.com (25)
- http://snapshotcap.blogspot.com (25)
- http://meishien.com (25)
- http://vielerfolg.com (25)
- http://www.remi-vespa.com (24)
- http://www.lloydlopez.com (24)
- http://localexpert.today.com (23)
- http://www.niharsworld.com (23)
- http://www.waycoolmodz.com (23)
- http://ip-internetcafe.co.cc (23)
- http://bald-guy-about-technology.blogspot.com (23)
Thanks again to all EC droppers, and please visit all above links to get best videos, pictures and many funny n serious articles..
Sep 22, 2008
Finally i solved all bugs n made it user friendly..
n now im releasing DropMaster v1.09 for free to use..
What is DropMaster v1.09 ??
-This is an application (built in flash and xml) which allows EC to users get updates of inbox drops..
also you can create your own dropping list for daily drops which you have bookmarked.
This is not an automate program so you need to press manually on your drop list items to browse and drop. Here nothing is illegal coz DropMaster using your inbox n top droppers RSS and your own custom drop list. :)
Features :
1] Reads your inbox and updates automatically using rss..
2] Reads your top droppers list using rss..
3] Create your own favorite drop list of hundreds..
4] Useful for Dial up & Broadband users..
5] No need of setup/installation..
6] Simple and fast to use..
Links :
Web of xml generator for DropMaster:
http://drmluv.co.cc/dropmaster OR
http://dreamlove.110mb.com/dropmaster/
Download:
http://drmluv.co.cc/downloadDM OR
http://dreamlove.110mb.com/dropmaster/dropmaster.zip
[zip contains: dropmaster.exe, droplist.xml and readme.txt]
Entrecard web:
http://entrecard.com
How to use :
first you need to modify droplist.xml so go to xml generator
1] Copy your RSS links of INBOX n TOP DROPPERS from Entrecard
2] Paste RSS links in particular xml generator page
3] Add your custom list in Your favorite list field on xml generator web.
4] Add links as- Your link*Description;
[1st add link then use *(Asterisk) for differentiate link & description, then add ;(semicolon) at the end of your description]
e.g http://entrecard.com/blog*Entrecard Blog; http://registryeditor.blogspot.com*Great Registry Hacks; etc... (add how many you want)
5] *(Asterisk) and ;(semicolon) must be need to differentiate your list
6] Press 'Get XML code' to generate your xml file
7] Select generated xml code and copy all code
8] Paste all code in notepad(must b new file)
9] Save as 'droplist.xml' (When you are saving file, choose file type as: All files or xml) and replace droplist.xml with original droplist.xml
10] Copy 'dropmaster.exe' and 'droplist.xml' in single folder
11] Open your Browser (Firefox is best)
12] Run 'dropmaster.exe' and wait to load your rss data (before net must be connected)
13] When you select links from your custom list, then automatically it open in your browser
and removes opened link from your custom list (but not removes from top dropper n inbox list)
14] Don't close until u finish your drops from list (if you restart dropmaster, your list starts from 1st again)
15] When you browse your links then just minimize dropmaster n drop your EC, after drops restore(maximize) dropmaster n select ur links (Use ALT+TAB for better/faster use)
Note:
By default in droplist.xml have my inbox n top droppers links so you must need to modify list.
If you are familiar with xml then you can edit and modify manually..
If you think its useful for you, you can write post on it and also you allow to modify droplist.xml n distribute freely (only allowed to modify droplist.xml)[read copyright policy]
if you have any problem leave your comments here..
i spent three sleepless nights to build Dropmaster
[coz day time is work time :( ] so now im going to sleep, may be ill reply late
Sep 21, 2008
Yep, are you entrecard drop master?
Which trick you use for your daily drops??
How much time you spend to your 300 drops??
May be you have too much time to drop your cards But these days im busy in my work n still i wanna drop my all 300 drops in few minutes so i have written one program for my self to daily drop which make me Drop Master..Still im working on drop master program n finishing some bugs, n i wanna make it user friendly..
Features :
1] Reads your inbox and updates automatically using rss..
2] Reads your top droppers list using rss..
3] Create your own favorite drop list of hundreds..
4] Useful for Dial up & Broadband users..
5] No need of setup/installation..
6] Simple and fast to use..
What you think about it?? Leave your comments..
[ill publish DropMaster within 6/8 hours]
Sep 18, 2008
This setting allows you to Remove 'sendto' option from right-click menu (context menu).
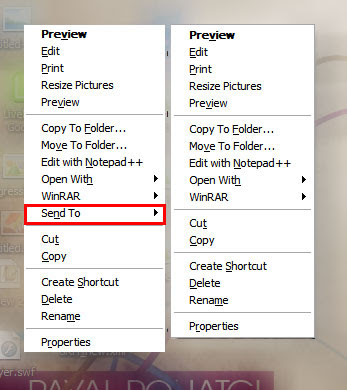
1] Run > Regedit > hit Enter
2] Registry > My Computer > HKEY_CLASSES_ROOT > select AllFilesystemObjects
3] AllFilesystemObjects > shellex > ContextMenuHandlers
4] ContextMenuHandlers > select Send To
5] now right side pane double click on '(Default)'
6] Add '-' (minus sign) in front of {7BA4C740-9E81-11CF-99D3-00AA004AE837}
7] like this ' -{7BA4C740-9E81-11CF-99D3-00AA004AE837}'
8] Now refresh your Desktop n check right click menu.. :)
Sep 11, 2008

This registry setting allows you to add a new file extension and file type that is currently not not available in your windows system, and adds inside your right click 'New' context menu .
Many time we needs a file to store our personal data, notes, reminders, appointments etc.. n which wants to identify easily in our system files..
By using this setting you can make your own file type n extension for your daily use :)
Settings:
(Dont use single or double quotes in complete setting)
1] Start > Run > regedit> hit Enter
2] Select HKEY_CLASSES_ROOT key..
3] Right Click> New > Key (add New key at HKEY_CLASSES_ROOT)
4] Write your file extension like '.note' ( or any other which you want, but use dot "." before extension, i used .note )
5] on right side pane double click on (Default) to modify '(Default)' value to file write as 'notefile'
(Do not use any spaces between file type value, you can use any other value too like myfile, mynotes so on..)
You just added file extension, now you need to set data for your file type..
6] Now go back to HKEY_CLASSES_ROOT key..
7] Create New Key by right click
8] write 'notefile' as key name ( we used 'notefile' is file type for our extension, which is same as where we set step 5, if you used any other file type write this same value as your key name)
9] On right side pane, double click on '(Default)' n set description for your file Like 'My note file'
( here you can use spaces)
10] then right click in blank space at right side pane n add new DWORD value, write 'BrowserFlags' as name, double click on BrowserFlags to modify n set Hexadecimal value '8' (Eight)
11] add another new DWORD value, name it 'EditFlags' n set Hexadecimal value '0' (Zero)
12] Select 'notefile' > add new Key > write key name - 'DefaultIcon'
13] on right side pane double click on '(Default)' n write path of your icon file for your extension
like 'C:\WINDOWS\myicon.ico'
14] Select notefile key, add new Key n name it 'shell'
15] Select shell Key, add new Key n name it 'Open'
16] Select Open key, add new key n name it 'command'
now you are here- 'HKEY_CLASSES_ROOT\notefile\shell\Open\command', ok?
17] Now on right side pane select '(Default)', double click to modify, n now right the path of application for your file type, like 'C:\WINDOWS\notepad.exe %1'
18] Now we want to add our file type inside right click New menu so go back at '.note' key
19] select '.note' key, add new Key n name it 'ShellNew'
20] On right side pane, right click in blank space n add new String value, name it 'NullFile'
(Dont set any value for this Nullfile, leave blank)
See image [Or Download this registry file for setting, n change the icon path in reg file, rename this file as 'filetype.reg' by removing .txt of file, and merge it)
Sep 6, 2008
I have started blogging from last month and i got more than 22 hits only for 'Remove/uninstall quick heal from registry' by Google search hit..
So i want post something about 'How to remove or uninstall Quick Heal from your PC?'
Quick Heal trial version runs only for 30 days, after 30days goes all function scanning functions OFF but runs only Online Protection.. After evaluation period you can't turn ON all other protection.. so you need register and activate your account or uninstall quick heal from your PC.
Quick heal have one bug, that is when you uninstall quick heal from your computer then automatically clean its registry from your computer..
So you can use trial version again for 30 days.. means you can use quick heal for unlimited period..
Now ill tell you how to remove quick heal and use unlimited..
First: How to Remove or Uninstall Quick Heal from Your PC ???
1] Go to Start> Control Panel
2] Control Panel> select Add or Remove Programs (hit Enter or Double click to open it)
3] Select Quick Heal Total Security from list..
4] Press Change/Remove button to remove Quick Heal from your PC..
5] Yes to Proceed
6] Select check mark for Remove report files
7] Restart your computer to completely remove quick heal (Restart is must)
After restart:
Run your Setup of Quick Heal form your PC or Download Latest version of Quick Heal from web to your PC.
Install Completely Quick Heal and it runs with all protection for 30 days again..
After 30 days do same above process n use quick heal for 30 days again...
Removing Quick Heal from Registry is not necessary..
if incase you want to remove Quick Heal from your Registry follow these 3 steps:
Open registry editor and then
1] go to HKEY_LOCAL_MACHINE > SOFTWARE > Quick Heal
and delete Complete Quick Heal Key..
2] HKEY_USERS > .DEFAULT > Software > Quick Heal and delete this key too..
3] HKEY_USERS > S-1-5-18> Software > Quick Heal and delete this key too..
And for remove Quick Heal from Right Click, Read This Post
Update : 28.2.09
Download Quick Heal uninstaller from Quick heal esupport . This Application will clean all registry n quick heal system files.
Sep 4, 2008
Now a days everyboy knows that what is 'Chrome'..
but few of them knows that what is Lively.. Last week i found Google labs new experiment of 3D chat n that is Lively 3D Chat..
[Lively - Experience another dimension of the web]
Lively is pure web based 3D chat, you can dance, walk, play or do anything what you want in chat..
See some screenshots and them ill tell you more... you can make your own rooms and use furniture to decorate your rooms...
 You just need speedy net and firefox or IE (Lively not works on Chrome)
 You can customize your avatars, nick or rooms too
 For loading Lively on my firefox it takes 2/3 minutes
 You can change your view of look in your chat rooms
I Don't wanna tell you more about Lively, just click below image for coffee with me..
[First Read instructions below]
Do you like coffee with me?(Click below)
For move your avatar- left click on avatar n drag your mouse when your cursor changed to four arrow cursor..
for zoom in & zoom out- use scroll of mouse..
for rotate view - press right click n move your mouse
also you can use all arrow keys on your keyboard for navigation..
Start your chat after room materializing finished..
Use left click on object and click on 'move to' button for moving your avatar directly on that object..
or double click on rotating green n white striped half balls in scene to go on that place
Right click for animations like dance, walk, wave, sit or show your emotion..
Send massages from bottom text field..
See Dialogue color & avatars nick color to read who sent massage..
to send private massage to your friend, right click n use 'whisper to' button..
don't shy in chat room cause everyone in room is new on lively so no one is expert
Enjoy n learn, and tell me if you found any new tricks on Lively ]
[Important: You need google account to login Lively 3D Chat and Lively plugin required..
Download Plugin @ http://www.lively.com/html/landing.html]
See more about Lively @ http://lively.com or chack google lab http://labs.google.com
Please Feel free to comments & subscribe to my RSS
Sep 3, 2008
World's ever super n simple trick to hide n protect your files...
5 comments Posted by mad1421 at 2:17 AMEveryone wants to protect our private data files like photos, video files, docs, letters and many other type of files from friends, hackers n any other peoples who want to get your secrets...
Many peoples facing another problem on web that is file sharing..
If you send your pic to friend it got many others too..
Also many free web host user always face one problem that is they cant share mp3 files n video files on free web host..
Im always using my one favorite trick to hide n protect my files from friends, colleagues..
i also stores my mp3, video files on my free web host..
I wana share this trick with you..
Lets start... This two files i wanna protect from my colleagues...
so now ill explain how to protects these two files in a just 5 seconds..
First you need to set some parameters in Folders options in explorer.
1] Open My Computer
2] go to Tools > Folder Options > View
3] and Remove the check mark of 'Hide extensions for known file types'
Like in below image..
4] Now select file which you want to hide or protect
5] Press F2 or rename from right click menu...
6] if you want to hide an image then rename your image files extension as .exe instead of .jpg
See what i did.. [ i changed 'myPhoto.jpg' file as 'myPhoto.exe' and 'love.txt' as 'love.jpg']
This is the my real trick to hide n protect files.
obviously changing extensions means changing properties of files too..
so now our file changed properties n context menus.. Now only you knows that what is the real extension of our files, but no one other is know that whats the real extension of the files.. so whenever others got your files they will try to double click to open or they will try to open those files in associated programs to open..
If they double click on you files, they got an error n shockd cause if you used .exe extension then it show error like
and txt to jpg if someone got your renamed file then mostly double click or hit enter for open file.. so when you want to protect your files then simply rename n change extension..
You can use extensions like .exe, .dll, .mp3, .avi etc for images
and .exe, .dll, .jpg, .bmp, .gif, .png etc for text files
and if you wanna upload your mp3 n video files on free web host
rename your files as .txt, .htm, .html, .sql, .tpl, .php, .jpg, .bmp n many more supported extensions of your host, after download rename n your exteions original
This is just simple trick to hide n protect files..
If you like this my simple, feel free to comment or ask any queries..
and if you want to get these tricks in your inbox just subscribe my RSS
Sep 1, 2008
Last week i got new hack to change the position for open with and winRAR context menu..
I just added single DWORD value in CLSID of open with n winRAR and it works perfect in a single try..
So i like it share with you..

Lets start..
follow my few steps and change your context menu position...
Settings:-
1] Start > Run > regedit> hit Enter
2] Registry > HKEY_CLASSES_ROOT > go to 'CLSID' key
for Open with..
3] CLSID > find & select {09799AFB-AD67-11d1-ABCD-00C04FC30936}
(to find press ctrl+F, look at only keys)
4] On right side pane you will see '(Default)' string value like 'Open With Context Menu Handler'
means your at right key
5] Right click in right side pane > add New > DWORD value
6] Name it as 'flags' > hit enter to save
7] Double click on flags to modify> set Hexadecimal value '1' (one)
8] Now refresh your desktop n check context menu
for WinRAR...
3] CLSID > find & select {B41DB860-8EE4-11D2-9906-E49FADC173CA}
4] Right click in right side pane > add New > DWORD value
6] Name it as 'flags' > hit enter to save
7] Double click on flags to modify> set Hexadecimal value '1' (one)
Remember:
1] if you set flags to '0' (zero) - Your selected context menu will be display under Rename menu
2] if you set flags to '1' (one) - Your selected context menu will be display with sendTo, copy to folder n move to folder (like in image)
3] if you set flags to '2' (two) - It display at default position
Aug 29, 2008
This setting allows you to assign any file on your computer a new right-click menu (context menu) entry.
This entry is named "Open with..."
By using this menu you can open any file from any other applications..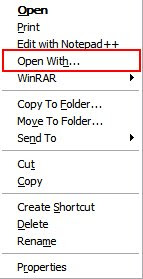
Settings:-
For any File:
1] Start > Run > regedit> hit Enter
2] Registry > My Computer > HKEY_CLASSES_ROOT > select * (1st subkey)
3] * > shellex > select 'ContextMenuHandlers' & right click > then New > Key
4] then replace 'New Key #1' key name to 'Open With'
5] on right side pane, select '(Default)' name n Double click on it, then brings Edit string field
6] enter value data as '{09799AFB-AD67-11d1-ABCD-00C04FC30936}'and hit Enter.
(Plz enter value as case sensitive with curly braces)
[or Download this file, rename and remove .txt extention, n merge it]
Aug 27, 2008

Do you want to change your drive icons?
Do you wanna set different icons for different drives??
OK, then I'll tell you very simple trick to change our drive icons.
We don't need edit in registry for change icons. We will use an drive's autorun property, so we need add autorun command file at the root of our drive where icon want to change.
Let's first collect/select some good icon files (*.ico - icon files) to use or set to our drives.
Then Start to set icons,
setting:
1] Open 'notepad' > Save as 'autorun.inf' (*.inf file- setup information file) at the root of drive (which drive's icon we want to change) (e.g. - C:\autorun.inf)
2] in autorun.inf file write below two lines
[Autorun]
icon="myiconfilename.ico"
and save this file.
3] Copy your icon file at the root of drive where we saved autorun.inf file.
4] Rename icon file as 'myiconfilename.ico' [icon file name and autorun icon names must be same]
4] Set hidden property for both (icon n inf) files.
5] Restart your system.
6] Do that same above process for other drives if you want to change all drive icons.
(you can't change CD/DVD drive icons, but you can use for flash drives, if you want to change CD/DVD icons then you can burn 'autorun' n 'icon' file on disk)
Aug 21, 2008
Everybody has own custom folder in his computer to save, collect, work, music and for anything else, we use one or few more folder always for whatever we save or work...
So i wanna tell you one trick for 'How to add our favorite folder in SendTo menu'
There is no any trick in registry to add this context menu.. :-)
We just need to add shortcut of our folder in users SendTo shell folder..
Lets Start,
Settings:
1] go to Start> Run
2] Enter '%USERPROFILE%\SendTo' and hit Enter...
3] Then right click in anywhere in blank space in this folder...
4] Add new shortcut from New menu
5] It brings 'create shortcut' window...
6] browse in select your folder which you want in SendTo.. n Next
7] Name it what u want and press finish
8] Now select your shortcut folder > Right click > Properties
9] select shortcut tab, and 'change icon' for this shortcut folder...
10] Refresh your desktop and check your SendTo menu... :-)
[Note: SendTo menu only copy your files n folders, never move your file]
Aug 17, 2008
Who mostly uses a photoshop to editing images, if they want to open an image file then they use file > open from photoshop menus..
Me 2 mostly use photoshop for editing images but im lazy to open every image from photoshop's open menu, so i edit some keys in my most favorite registry editor to add context menu for open jpg/jpeg to photoshop directly....
and made my context menu something like below image.. look it...

Now im giving you settings for this hack...
1] Start > Run > regedit> hit Enter
2] Registry > My Computer > HKEY_CLASSES_ROOT > jpegfile
(if you not found this key then Find it from edit> Find> n tick to key only)
4] Then name this new key as 'Open in CS2' or something like you want to set
5] Select 'Open in CS2' > add New Key again > name it 'command' (case sensitive)
6] select '(Default)' from right side pane > Double click to modify value
7] enter value as [ C:\program files\Adobe\Adobe Photoshop CS2\photoshop.exe "%1" ]
(means - your photoshop application path and "%1" with quotes )
8] refesh desktop n check any jpg/jpeg image files context menu
Download jpg-cs2.reg.txt file , rename this txt file as 'jpg-cs2.reg' and merge it..
Update: 01.Feb.09
Download Application to set Open with context menu for images
Aug 16, 2008

In windows, we open some files with other supported applications too.. like mp3 files we can open with winamp, media player, itune, or many other mp3 players...
Now here ill tell you hack for how to remove unwanted applications from this open with list..
This is very simple n useful trick
lets go..
Settings:-
1] Run > regedit > hit Enter
2] Registry > My Computer > HKEY_CLASSES_ROOT > Applications
3] When you expand 'Applications' key then you will see a long sub keys list of program names
like accwiz.exe, BitTorrent.exe, n something like more list..
4] Then select a application key which you want to remove from 'Open with' list..
(e.g.- i selected 'flash.exe' to remove from list)
5] Right click in right side pane in blank area or go to Edit> New
6] add New> 'String Value' (REG_SZ)
7] Change name of string value as 'NoOpenWith' (case-sensitive)
8] We Don't need to set any value data for this string..
9] Refresh your desktop n check open with list for any file..
Finish... :-)
Aug 14, 2008

When we install 'Quick heal' anti virus then it also adds a property tab for every file to show is it infected or not...
This tab is graphical tab so it takes little bit time to load.. so we never use this tab.. so i got hack to remove this tab easily..
This setting removes this tab and makes your property window loads faster....
Settings :-
1] Run > regedit > hit Enter
2] Registry > My Computer > HKEY_CLASSES_ROOT > select * (1st subkey)
3] * > shellex > PropertySheetHandlers >
{9ECB3F62-A9BC-4ff1-8E26-4F8BA5363190}
4] select '{9ECB3F62-A9BC-4ff1-8E26-4F8BA5363190}' > Right click > Rename or Press 'F2' on keyboard to rename key
5] add ' - ' (minus sign) in front of this key ( before curly braces)
6] Now your key is like '-{9ECB3F62-A9BC-4ff1-8E26-4F8BA5363190}'
7] Hit Enter
8] refresh your desktop or my computer, and check ur property window for any single file
That's Done,
Good luck
:-)
Aug 13, 2008
 When we install 'Quick heal' then it display 'Total Security Scan' menu in our right click context menu for all files, folders, n drives and it also shows a lens icon front of menu, we often use this context menu.
we mostly use this context menu for flash/pen drives, CD/DVD's to check viruses.
This setting allows you to remove this 'Total Security Scan' menu form right click context menu for any file and any folder, this is very simple trick for registry hack..
Settings:
For any file:
1] Run > regedit > hit Enter
2] Registry > My Computer > HKEY_CLASSES_ROOT > select * (1st subkey)
3] * > shellex > ContextMenuHandlers > RCScan
4] RCScan > select '(Default)' from right side pane > Double click on it to modify
5]insert ' - ' (minus sign) front of value
'{362A3A82-5EF4-422F-817F-A17EBA53E67C}'
like
'-{362A3A82-5EF4-422F-817F-A17EBA53E67C}'
[use minus sign front of curly braces instead of delete value, cause when you will remove this minus sign then context menu will be activate again, or else you can delete 'RCScan' Key for permanent remove context menu, settings checked form version 8.0.0 +]
For any Folder and Drive:
Use above trick for
HKEY_CLASSES_ROOT\Folder\shellex\ContextMenuHandlers\RCScan
Done;
Good Look.. :-)
Aug 11, 2008
 This setting allows you to assign any file on your computer a new right-click menu (context menu) entry.
This entry is named "MoveTo Folder..." which is copy current selected file/files to any folder directly from Right click menu..
Settings:-
For any File:
1] Start > Run > regedit> hit Enter
2] Registry > My Computer > HKEY_CLASSES_ROOT > select * (1st subkey)
3] * > shellex > select 'ContextMenuHandlers' & right click > then New > Key
4] then replace 'New Key #1' key name to 'Move To...' or as u wish you can write
5] on right side pane, select '(Default)' name n Double click on it, then brings Edit string field
6] enter value data as '{C2FBB631-2971-11d1-A18c-00c04FD75D13}' in it n hit Enter.
(Plz enter value as case sensitive with curly braces)
For any Folder:
1] Start > Run > regedit> hit Enter
2] Registry > My Computer > HKEY_CLASSES_ROOT > Folder
3] Folder > shellex > select 'ContextMenuHandlers' & right click > then New > Key
4] then replace 'New Key #1' key name to 'Move To...' or as u wish you can write
5] on right side pane, select '(Default)' name n Double click on it, then brings Edit string field
6] enter value data as '{C2FBB631-2971-11d1-A18c-00c04FD75D13}' in it n hit Enter.
(Plz enter value as case sensitive with curly braces)
This setting allows you to assign any file on your computer a new right-click menu (context menu) entry.
This entry is named "Copy To Folder..." which is copy current selected file/files to any folder directly from Right click menu..
Settings:-
For any File:
1] Start > Run > regedit> hit Enter
2] Registry > My Computer > HKEY_CLASSES_ROOT > select * (1st subkey)
3] * > shellex > select 'ContextMenuHandlers' & right click > then New > Key
4] then replace 'New Key #1' key name to 'Copy To...' or as u wish you can write(but use as nick)
5] on right side pane, select '(Default)' name n Double click on it, then brings Edit string field
6] enter value data as '{C2FBB630-2971-11d1-A18c-00c04FD75D13}' in it n hit Enter.
(Plz enter value as case sensitive with curly braces)
2] Registry > My Computer > HKEY_CLASSES_ROOT > Folder
4] then replace 'New Key #1' key name to 'Copy To...' or as u wish you can write(but use as nick)
5] on right side pane, select '(Default)' name n Double click on it, then brings Edit string field
6] enter value data as '{C2FBB631-2971-11d1-A18c-00c04FD75D13}' in it n hit Enter.
Aug 4, 2008
 This setting allows you to Direct Preview of image containing folder, setting adds a Right Click (context menu) to your every folder.
This entry is named "Image Preview for folder" which will simply open Windows Picture & Fax viewer containing all images from selected folder n shows preview instead of single file image preview
Settings:
1] Start > Run > regedit> hit Enter
2] goto > HKEY_CLASSES_ROOT >Directory >shell
3] right click >New > Key> write 'Image Preview for folder'> hit Enter
4] right click on 'Image Preview for folder' >New > Key > write 'command' > hit Enter
5] in right pane select '(Default)' > double click on it
6] Write value as
'rundll32.exe C:\\WINDOWS\\System32\\shimgvw.dll,ImageView_Fullscreen %1'
(in single line without quotes) > hit Enter
7] Refresh desktop or My computer & Check any image contained folder ;-)
This setting allows you to assign any file on your computer a new right-click menu (context menu) entry.
This entry is named "cmd for this folder" which will simply open a command prompt (cmd) in the folder where the file selected is located.
2] Registry > My Computer > HKEY_CLASSES_ROOT > select * (1st subkey)
3] * > shell > expand shell key & right click > then New > Key
4] then replace 'New Key #1' key name to 'cmd' or as u wish you can write(but use as nick)
5] on right side pane, select '(Default)' name n Double click on it, then brings Edit string field
6] enter string as 'cmd for this folder' in it n hit Enter.
7] select our 'cmd' key & right click >New > key (again)
8] 'New Key #1' Replace to 'command' (case sensitive without quotes)
9] selcet '(Default)' name & double click on it n enter string as 'cmd.exe /k' (case sensitive without quotes)
10] Quit registry editor n refresh Desktop or My computer & go to any single file & right click to file, you will see lik tht

The Microsoft Computer Dictionary, Fifth Edition, defines the registry as:
A central hierarchical database used in Microsoft Windows 98, Windows CE, Windows NT, and Windows 2000 used to store information that is necessary to configure the system for one or more users, applications and hardware devices.
For more brief defination of registry, hives, keys, subkeys & values, read microsoft's help at http://support.microsoft.com/kb/256986 & http://en.wikipedia.org/wiki/Windows_Registry
 To Open Registry Editor go to Start > Run
(or Press Windows key+R) and then enter
'regedit' (witout quotes) like in image..
Click 'Ok' Button or Hit 'Enter'
Then it will Bring Registry editor in front of you.
like below image
OR
You can go to My computer & type 'C:\WINDOWS\regedit.exe' (without quotes) in address bar & hit 'Enter' key
WelCome to Registry Editor Bolg, Here You Will Get Very Great Hacks n Tricks for windows Registry. I like editing Registry editing so i got some great hacks when i research on it. & Here i like to Share it with you, But my english is very BAD so sorry to understaning my bad english ;-)